
Email from LinkedIn
How to Solve Problems as a Team
In building the design practice at Appiphony over the last few years, I’ve researched quite a few methods and frameworks. I’ll look at anything that smells like it’ll make us smarter or more efficient…books, blog posts, workshops, and so on.
But when I picked up Max Shron’s Thinking With Data, it was more or less on a lark. I was curious about data science and it looked like a friendly introduction; I didn’t expect to bring anything back to my team.
Good news: I was wrong. Max’s book contains one of the most useful things I’ve read this year, and it’s got nothing to do with numbers. It’s a problem-solving communication tool he calls CoNVO, and you use it to structure conversations about the problem to bring others up to speed. “CoNVO” is a mnemonic:
- COntext: What’s the setting in which this problem exists?
- Needs: What specific items do we know of today that need to be addressed?
- Vision: What’s the initial concept of how we plan to solve the problem?
- Outcome: What does the future success state look like in which the problem is solved and the organization has adopted the results?
If you’ve ever spent time “level setting” a colleague about a new issue your team is facing, you’ll benefit from this approach. Moments like this happen almost every day for me, whether we’re talking about a small bump in the road or a major new initiative. It reminds me of a good chef’s knife: you can tackle almost anything with it, so you end up reaching for it all the time.
An Example
Here’s a quick example, illustrated for effect.

Context: we’re out in the wilderness and there are no towns for a few miles in every direction. We’re coming down a hill, approaching a stream that empties into a lake.

Needs: we’re getting tired, and we’re a bit thirsty.

Vision: there’s a dry, level area on the other side of the stream. We can probably step across where it’s shallow, but once we get closer, we might decide to go a little further and walk across the makeshift bridge.

Outcome: with our camp set up, we’ll have water from the stream, and a nice place to rest.
This structure works just as well with your next multimillion dollar initiative; just substitute in different details. If you’re situation has specific metrics associated with it (e.g. success equals a 20% increase in revenue), place those in the “outcome” section.
The “outcome” section is my favorite, in fact, because that’s how you open the door for team collaboration. Separate the “why” and the “what” from the “how.” Whatever you’re trying to accomplish, emphasizing the goal instead of your solution leaves room for others to bring you amazing ideas.
How to Use Story Maps for Design Collaboration
It’s Monday, 9am. According to the color-coded schedule published by the project manager, it’s time to start designing that new software module you’ve all been talking about. Everyone knows what the module will be called, but that’s about the only thing everyone knows.
So, what…exactly…do you do?
User Story Mapping is the tool I reach for in this situation. Jeff Patton’s story mapping process allows you to start with a vague target and end with something that’s both specific and digestible by your team. In our practice, a UX designer leads a story mapping workshop at that critical Monday 9am moment, and the resulting map becomes the foundation for the next 6-12 weeks worth of build work.
Jeff’s book explains the mapping process well, though not as much is said about how teams “metabolize” the story maps and what they do next. In this article, I’ll share what we do after we make the initial map, particularly with regard to the non-designers on the team.
Who Needs What?
When we first began using story maps, we started with a few row’s worth of sticky notes to capture the minimal scope—and then we stopped. They built shared understanding in the moment, but people’s attention drifted back towards the usual design artifacts shortly thereafter.
We extended the story map process in response to certain needs non-designers immediately encountered:
Developers need to clearly understand what they’re being asked to build so they can identify technical risks and estimate effort as early as possible.
Product Managers need to clearly understand what will be shipped now, what will be part of a future release, and judge whether today’s value proposition is sufficiently compelling.
Testers need to clearly understand what will be built and what the “happy path” user flow is relative to the alternates to know what to emphasize.
It was great to point to the story maps to explain the user’s activities and target outcomes, but each group was “left hanging” in some way without seeing the design solution. So, one day, we built a simple story map in the morning, had lunch, and tried something new in the afternoon.

The product manager, the lead developer and I went back through the story and discussed the most obvious design concept that would serve each step the user took. I sketched up a rough version on the spot on a large 4x6 sticky note with a Sharpie. (Using a fat marker and a small piece of paper prevented us from getting caught in the weeds.)

The book on story mapping shows examples where designs are placed above the sticky notes, but I like to imagine the software literally supporting the activity by “holding it up” from underneath. I’m also trying to reinforce that the user activities are the primary element to focus on, and any number of software concepts can be swapped in below.
We fleshed out the designs just enough to give everyone had a mental image of how the key actions would function, and the overall map reinforced what was in/out of scope. With that high-level understanding, the development lead provided a ”T-shirt size“ estimate for the effort to build each piece of the design. He also called out which areas could be a stretch from a feasibility perspective.
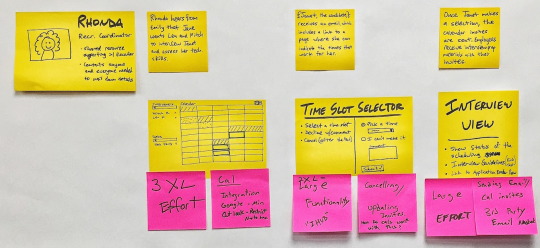
We captured the technical input on red sticky notes; it felt natural for developers to put up “red lights” (without feeling like they were raining on the parade) and I was surprised how quickly they took to it. It seemed to strike the right balance between feeling heard but not being obligated to a precise estimate or deadline.
By the same token, the design team is not boxed into those original sketches. Over the next few days, our designers flesh out the missing details and make refinements. (As long as the polished output has roughly the same development cost as the initial ideas, people take the change in stride.) We also found the test team wanted to have these extra details available before they made their assessment, so we wait until this slightly later date to loop them in.
Is This Good Enough?
So with the spine of the story in place, the design concepts visible, and effort estimates applied, the team can sit back and assess the work holistically:
Is this dramatically more or less scope than we usually put into a release?
Is there an unusually high level of technical risk?
How might customers react to these new features?
That last question set the stage for one of the most important moments of the entire project: while we were reflecting, the product manager had an uneasy feeling we were stopping short and simply not delivering enough value. We knew we could do more heavy lifting for the user if we really wanted to “go there.”
We had a candid conversation about the effort needed to solve the market need in a more complete way, even though it would take us beyond our predefined time boxes. The story maps gave the product manager the information he needed to successfully lobby for a later release date, and we delivered something far more valuable.
Bringing People Together
I’m very happy with the benefits we’ve seen by extending the story maps into the solution space, though if there was a single reason to continue this approach it would be improved team morale.
I was surprised to see just how much better everyone felt walking out of the story mapping session with a picture of the work ahead of them and how much effort it would be to get there. We’re now used to hearing things like:
“This looks like a lot, but I’m pretty sure we will get it all done.”
This is what a healthy dynamic between designers and developers sounds like, in the beginning. Think of it as the first words spoken by your integrated build team: staffed with design, coding and quality experts, and held together with this type of positive sentiment.
This is when people truly start working together.
Ramp Up Gradually If Your Team Is New to UX Design
Remember your first Agile project? It took a lot to convince people to trade lengthy spec documents for a stack of index cards, but everyone knew things needed to change. Even still, success wasn’t guaranteed and there was plenty of anxiety to go around.
Now imagine that same software team changing processes yet again, this time taking their first steps to incorporate user-centered design into their work. How will everyone feel? Who’s rooting for the change? How high are the stakes?
Avoiding a Big Bang
I’d argue this team should consider ramping up gradually and deepening their design process over time. Depending on the interpersonal dynamics, a Big Bang for design can be unnecessarily risky.
When start a project with a new client, the “bang” we gravitate towards is bang for the buck. We begin with lightweight techniques that yield outsized results and give the client a taste of what user-centered design offers. Here’s a few examples:
- Story Mapping is a lo-fi activity that uses sticky notes to take agile user stories to the next level. You start by calling out the users’ target outcomes, and then you break out the sequence of activities users actually perform to achieve each one. It’s a great way to clearly define the problem you’re solving, enabling you to work backwards and design a solution that fits.
- Personas are very tricky for inexperienced teams; if you’re just getting your feet wet, schedule five interviews with real users and discuss what you learned with the core contributors. Most teams walk away with at least a few ways to improve their offering and a better sense of the users’ target outcomes.
- If you think the team is ready for a more specific mental picture of the users, pull the names of your archetypes (i.e. personas) from the characters used in your marketing demos. You’ll have to pick some names to use for your demos anyway, and this gives the team a way to connect the personas to something concrete.
- Basic usability testing can be done in the hallway; skip the fancy lab environments with one-way glass until you really need it.
Each of these methods pave the way for more extensive practices in the future while building credibility and comfort with a design-driven process. The idea is to hand out an appetizer and see how people react before serving a big plate full of UX methodology.
One step at a time
I recently saw Dr. Steve Julius, former psychologist for the Chicago Bulls, give a presentation about behavior and process change within teams. When asked about the number one mistake people make in this area, he offered this:
They try to change too much, too fast—and they become zealots.
Sometimes, slow and steady wins the race.
Further reading
Most of the tips above have been collected from the following (fabulous) books; I strongly encourage you to dig into them for more.
- Lean UX: Applying Lean Principles to Improve User Experience, by Jeff Gothelf and Josh Seiden
- Undercover User Experience Design, by Cennydd Bowles and James Box
- The User Experience Team of One, by Leah Buley
- User Story Mapping, by Jeff Patton
“I have bought this wonderful machine—a computer. Now I am rather an authority on gods, so I identified the machine—it seems to me to be an Old Testament god with a lot of rules and no mercy.”
Five Lessons for Product Designers from Google Ventures
Braden Kowitz, a Design Partner at Google Ventures, gave a great presentation at the the 2015 Prototypes, Process and Play conference consisting of five pieces of advice for those that do product design work.
- Work with management and redirect their energy like an akido master. Don’t fight when their design ideas aren’t great; instead, figure out a way to be “facing the same direction.”
- Focus on working through the risky elements of your product or service first, and don’t be surprised if it pulls you out of your personal comfort zone. If it didn’t, it wouldn’t be risky!
- Avoid spreading your design team too thin by setting priorities with senior management. Make sure to include a choice for teams to complete less important projects without design, and communicate what that means.
- Set tight “learning deadlines” to avoid over-polishing a given idea. It’s not always obvious when designers should put their pencils down.
- Design activities should be done by everyone on the team—at least a little—to instill the sense that design is everyone’s job. Developers can watch usability tests and go on site visits, for example.
At the end of the session, there was a brief Q&A in which someone asked about how to balance science with art and go with your gut. I really liked Braden’s answer, which I’ll paraphrase:
When there’s no hard data available, make decisions by identifying who has the best instincts for that type of decision, whether they be a visual designer, sales rep, support agent, or the CEO. Let that person decide, and call out the fact that you’re in subjective territory.
Use Personas to Serve Your Demanding Customers
If you’ve ever been part of a user-centered design project, you’ve probably heard the term persona when referring to something like this:

It appears to be a bio for a fictional person, meant to represent a specific type of user of your product. Typically, someone compiles a slide deck containing a handful of different personas, and that deck is presented to the team. Everyone is then supposed to “keep them in mind” during the design phase so the resulting product “works for them.”
There’s only one problem: you can do all that and not improve your product in any meaningful way.
The salient fact about design personas is that most “designers” don’t understand them and use them wrong.
— Alan Cooper, March 26, 2013
That’s a quote from the inventor of personas (and Visual Basic, among other things). The trouble is, there’s a lot of nuance to creating and using personas effectively. In my experience, it’s really easy for the team to slip up somewhere along the way. So what should we do instead?
A Useful Tip
One great piece of advice came in the form of a metaphor from Jonathan Korman during CooperU’s UX for Product Managers class:
Imagine you’re setting up a tent, and you’re trying to place the minimum number of tent poles in the optimum locations to get the most coverage. The poles are your personas, and what you’re covering is your target market.
So in a health care app, for example, you might have the following personas:
Julian, a physician who only needs to use a few key features of the system, but is impatient with technology
Lou, an elderly patient who has trouble with vision and fine motor control
Carol, a nurse who does the bulk of the heavy lifting in the app while juggling a massive patient load
All three personas “stretch the tent,” applying pressure on the design. To improve the product, the team might remove some friction for the physician, increase accessibility for the patient, and build some extra power user features for the nurse.
Each additional piece work contributes to a business goal: increasing the number of customers that can be served. If each of these demanding user’s needs can be met, the product will slightly overserve everyone “behind” them who’s not as demanding.
We used this technique in some recent work we did building a recruiting system. The behavior pattern we noticed was those asked to interview candidates do so “on the side” and aren’t deeply engaged with hiring. Hence, we created a way for them to view a candidate’s resume without even logging into the recruiting tool.
Meet Cornelius
MillerCoors takes this to a comical extreme with Cornelius, the lead character in a new series of ads for their Smith & Forge brand of hard ciders. Cornelius, and his extremely manly associates, enjoy a Smith & Forge beverage after a hard day’s work in the 19th century: blacksmithing, chopping down trees with an axe, and so on.

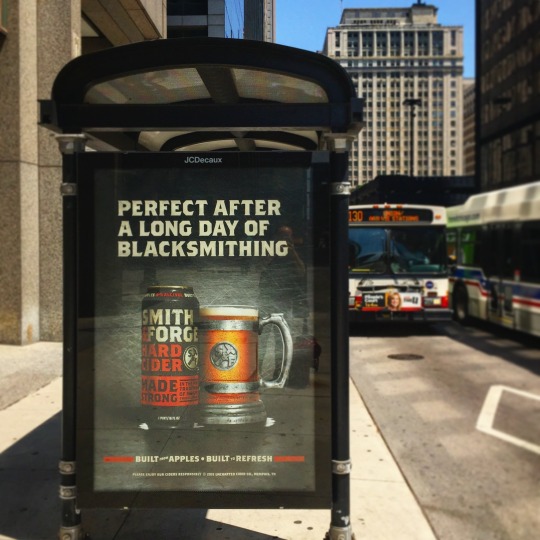
The message is simple: if this drink is manly enough for him, it’s manly enough for you.
How to Handle Design Feedback on Tight Timelines
There are two kinds of designers: those who’ll admit they’ve had trouble handling feedback, and liars. That’s why the new book Discussing Design: Improving Communication and Collaboration through Critique caught my attention. The authors (Adam Connor and Aaron Irizarry) shared a number of useful concepts around design critique that I folded into our process. This post is an overview of what we changed; I encourage you to read the book and apply the lessons in your work.
The Bigger Picture
The improvements we’ve made around critique act as a bookend to another recent process change in how we collaboratively generate a high-level design direction for a given set of features. Simply put, we come up with the basic ideas together, and we evaluate the full-fidelity designs together.
This is a subtle point, but it’s critical. Since all of our fingerprints are on the designs, no one feels like they’re in front of the firing squad during the critique. Even if one person did the lion’s share of the detailed design, they can still switch hats and be a critic.
The 75/25 Process
As it relates to critique and iteration, the basic process is as follows:
Collaborate on the high-level design direction for a given set of features, but don’t use more than 25% of the available time.
Pause and evaluate the design concept against the higher-level project and business goals. (Whenever possible, also compare it to what you’ve heard from customers and users.) Decide whether you need to change direction, then select a solution.
Prototype that solution, but don’t use more than 75% of the available time.
Pause and analyze the effectiveness of the prototyped, high-fidelity design relative to the finer-grain objectives of that specific design. Identify improvements to make.
Use the last 25% of the time to make as many of the improvements as possible.
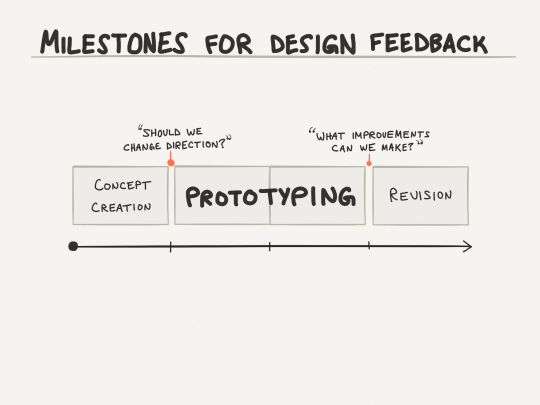
The 75/25 rule sounds a little arbitrary, but I borrowed it from Pixar. Without Lean-style pivots, a quarter of the way through is about the last responsible moment to change direction. And to make non-trivial improvements, developers will need at least 2-3 days in a typical two-week cycle (i.e. 20-30% of the time).
You can also look at the flip side: early on it’s too soon to nitpick, and later on it’s too late to make fundamental changes. In the middle, you mostly have to leave people alone and let them work.
Critique: Effectiveness Analysis
Adam and Aaron’s book gave me what I was missing to structure the critique session into something that’s a useful input to design. First, framing the session as one focused on analysis gets people into a critical thinking mindset. Try your best to keep people in an evaluative mode instead of slipping into a problem-solving mode. (There’s no magic trick to this; just stick to your guns and emphasize that you really want to devote this time to smoking out all the improvements you possibly can.)
A natural extension of the analysis is an articulation of the objectives. (I specify the key objectives in writing.) Explicitly discussing your targets is key to knowing whether they’ve been hit. In the book, the authors use the term “objectives” as a catch-all to capture anything the design should be factoring in:
Your personas and their goals
Your project’s business goals
The scenarios that have touch points into these features
Any design principles agreed upon by your team
Any relevant best practices for your target platform
and so on…
Depending on your culture, having a forcing function for a discussion of objectives might just be the biggest impact of properly managing design critique.
When the Going Gets Tough
The thing I’m most grateful for about the book is the frame of mind that helped me come up with these sentences during some uncomfortable moments:
“I hear what you’re saying about that [specific design element]. Can you tell me more about the problem you feel is inadequately solved by what we’re seeing now?”
“I can tell you’re not in love with this, and that’s OK. Which parts of this design seem to lack effectiveness?”
“Hmm, that’s interesting. I wonder if we should reframe this objective, perhaps significantly. Or have we identified an entirely new objective?”
“That’s a powerful idea, but it would take us in a new direction. Can I talk to the development lead and get back to you?”
Stakeholder issues a directive; “We can take that specific directive, but I’d like to go further; anything you can tell me about the line of thinking behind that will help me apply the same idea elsewhere.”
Though you might be bracing for impact, you may very well hear reactions you don’t expect. Depending on their personalities, some stakeholders may not make any decisions on the spot and ask for time to think things over. This feels anticlimactic, but it’s healthy. I think it’s part of the reason why the authors included a detailed example of sending the stakeholders the designs in advance(!) so that they can mull them over beforehand.
Are You Ready to Get Better?
I would definitely rather hear gushing praise instead of outright insults, but neither contain information I can use to improve the design of a product.
So why not use every available method to make things better? If Pixar does it, shouldn’t you? If engineers do code reviews, shouldn’t you do the same?
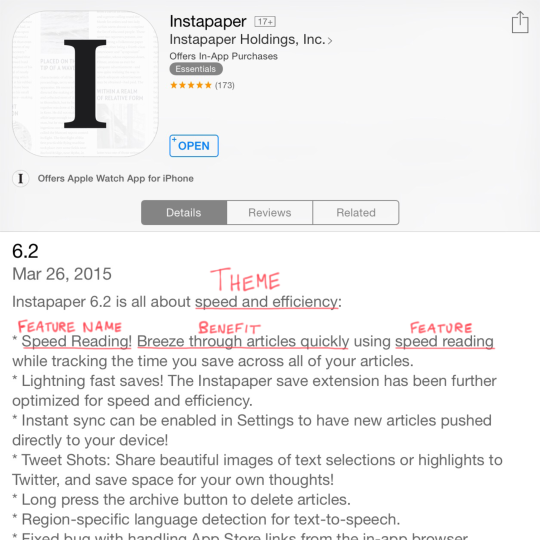
How to Write Great “Elevator Pitch” Release Notes Like Amazon
Amazon.com kicks off new product initiatives by writing a hypothetical press release announcing the arrival of the product, then iterating on that message until the vision is sufficiently compelling. It’s a fantastic technique, but it results in a few hundred words. Their release notes, however, provide an example of how to distill that message into a (much shorter) elevator pitch.
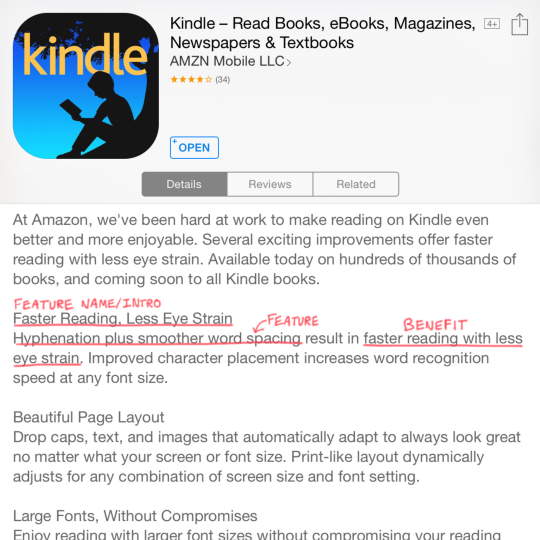
Here’s a recent update to the Kindle app:

First, they introduce the new feature—branding it, if you will. Then, they call out the benefit the feature creates. Finally, they list the actual feature(s) and provide some details on what it does.
The subtle, but critical ingredient here is highlighting the benefit users will get. If you scroll though your app updates, you’ll see that’s few and far between. Most vendors just list the features, like the one that happened to follow Amazon here:

A prior update to the Kindle app followed Amazon’s pattern:
The branding is not as strong, but we still see the benefit—even though improvements to typesetting and visual design can be tough to capture in words.
Instapaper had a theme for a recent release, which gave them an easy way to explain why a certain set of features arrived together. Without that, a update can feel like a grab bag with no clear “hook” for customers to understand it holistically.
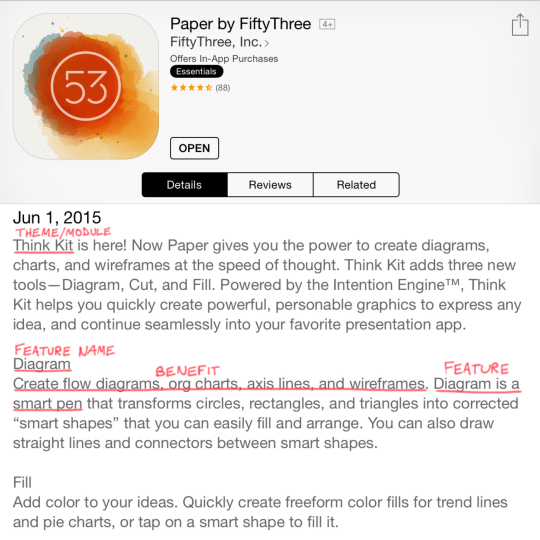
FiftyThree did something similar when releasing a new module for their Paper app. They introduce/brand it, give a quick overview, and then touch on each tentpole feature and the benefit it provides. In their case, that translates to an easier way to accomplish what was tedious in the past.
Adding the “Who”
If you’re building technology for the enterprise, you’ll probably need to include the target user(s) served by the new feature, for example:
System administrators can protect corporate data if a mobile device is lost or stolen with the remote wipe capability introduced with iOS 4.
Once you add that element, you have something that lines up nicely with the Customer-Problem-Solution framework from Lean Startup. If you’re already using that approach, you’ll have a great starting point for this exercise.
Whatever you do, begin with the end in mind so you have more than a list of features when it’s time to ship. Remember: code is a liability. The benefit it creates is the asset.

The Presentation Zen Sketchbook
The Presentation Zen Sketchbook is the first sketchbook I actually filled, and re-ordered. It’s great because:
Some pages have a 2×4 grid of boxes, which is perfect for multi-step user flows or planning presentations, but
Some pages are blank, allowing you do to freeform sketching, but
Most of the “blank” pages actually have small images and phrases, which avoids the mental block of staring at a blank page, and
It’s not too big or too small
Highly recommended if you’re not happy with what you have.
Use a “Show & Tell” to Pitch Your Product Like Salesforce
If there’s one book I wish I’d had in the beginning of my career, it’s Dan Roam’s Show & Tell. The book walks you through improving any presentation with three simple rules:
- Tell a story. (Have a clear narrative.)
- Tell the truth. (Keep it grounded.)
- Tell it with pictures. (Show something!)
I use Dan’s advice and templates almost every week, and I’m starting to see the pattern in other places. Salesforce’s marketing execs gave an overview of their major product offerings at a recent event, and I saw these key elements in their presentations.
The pitch for their new analytics product had all three pieces. There’s a clear story line starring a persona named Jackie, and the sense of truth is built by the realism of the scenario and the pictures of the product proving it’s not vaporware.
Strengthening Each Area
Dan’s approach can also be used as a framework for critique to improve the pitch, for example:
- Story: The story was about 10 minutes; where could it have been tightened up? Salesforce’s other product overview videos clock in around two minutes.
- Truth: I often find these stories work out a little too perfectly, which can diminish the credibility of the speaker/company. Writing well is hard, and attempts to add pizzaz often sound cheesy to the audience.
- Pictures: Could the narrative itself have been expressed in pictures somehow? That would have added some clarity.
Other portions of the keynote emphasized story, truth and pictures to different degrees, and you can see how that effects the results. This video about GE Capital had top-notch production values, but contained at least three different messages:
- Salesforce’s analytics tools make GE Capital successful
- GE Capital helps companies like yours succeed
- You need great analytics to succeed today
Those things are probably all true, but saying them all at the same time creates fog around the narrative. Editing can be gut-wrenching, but it’s better to end up with one clear story.
Surprisingly, there was also an piece of the keynote which was literally just a story. This wedding day disaster could have been lifted from a romantic comedy, but it wasn’t possible to include any pictures to reinforce it. It was all tell and no show, but too many people “believe it when they see it.” I’ve found an unexpected link between pictures and truth, at least for stories about products.
Product or no, your next presentation will be better as a story, with truth that resonates and plenty of pictures. Try it.

Becoming Steve Jobs
Becoming Steve Jobs, the new book by Brent Schlender and Rick Tetzeli, is a great read for those that want to know more about the man himself. I came away from the book with an understanding of Steve that was more nuanced and three-dimensional.
Don’t expect to find lots of tips for how to create great products, however. Steve’s story includes that, obviously, but it’s not the focus of the book. Still, two ideas stuck with me:
Maintain your focus on the few pieces that are truly important. Don’t get distracted with the million other things in this world. Say “no” a lot and let other things slide.
Develop an organizing principle—a clear “why”—behind what you’re doing. Your customers will eventually need to hear it, and your team can’t fully get on board with a plan they don’t understand.
So if you want to know Steve, read this book. But if you want to be Steve—and guide smart people to create incredible things—start with Ed Catmull’s Creativity, Inc. I’m planning to go back and re-read it now.
Use a Feature Overview for Kinder, Gentler Requirements
You look like a smart cookie. You already know starting your software effort with a giant requirements document isn’t the best plan. (Much has been written about that, though I have a favorite.) It’s counterproductive to pretend like you know every detail of what you’ll build before you start.
On the extreme other end of the spectrum, you can question every assumption, choose a few key targets, and test multiple ideas to see which hits those targets best. (Much hasbeenwritten about that, too.)
But what if you’re in the middle?
What if you’ve got a feature idea that “has to get in”—don’t gimme that look, it still happens—but you’ve got wiggle room on the specifics? Or maybe you already have validated learning behind the basic concept, and now it’s time to flesh it out further? How do you present this to your team?
To be more specific: what’s the best way to engage your development and testing teams on a new idea so it becomes a robust feature by release time?
My strategy is to give the team an overview of the feature, and then work together on all the picky details.
The Anatomy of a Feature Overview
The Feature Overview has a few different pieces to it, and a minimum of jargon so non-technical folks can follow along.
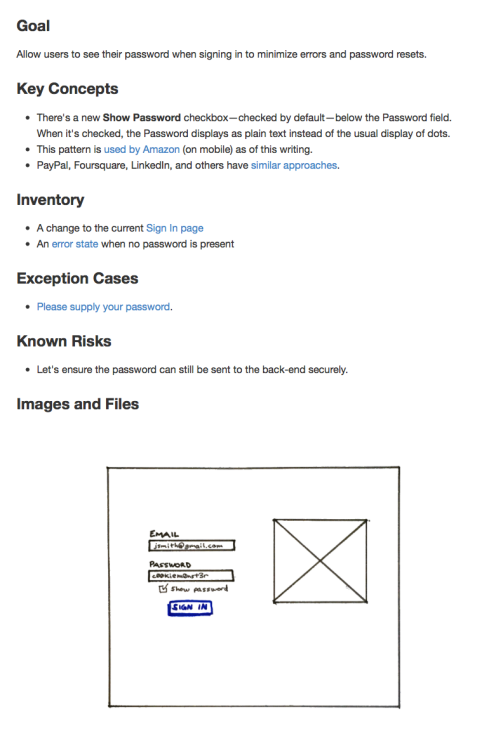
There are five or six sections, depending how you count it. Here’s a sample.
Goal
Part of our culture at Appiphony is asking, “what’s the goal?” at the start of anything. (It’s great for meetings; try it sometime.) I often go with a simple “Allow users to…“ since that’s natural for developers. If you want to zoom out a bit, that’s great too; you can phrase it as the user’s goal or maybe use a job story. Just make it clear what success means.
Key Concepts
There are usually a few critical things the team needs to understand about a design to fully “get it.” This is where I include those. If I can anticipate some questions ahead of time, I’ll answer them preemptively. You may also want to call out something that’s easy to miss, particularly if it’s tricky to implement. Direct their attention.
Inventory
This is a flat list of each component that’s part of the design. In addition to the screens, don’t forget copy for error/information states, subject lines and body text for email templates, and anything else that needs to be coded or tested. Review this list multiple times.
Exception Cases
I call this out as a separate section because I usually forget some of them, and my partners in QA swoop in and help. They’re almost always able to spot one or two “unhappy paths” through the flow we need to smooth out.
Known Risks
There may be parts of the design that simply can’t be built within the time and budget constraints. Call these out if you know them, and don’t be surprised when the developers add to the list. Once the concerns are all on the table, assign tasks to write just enough proof-of-concept code to determine if the design needs to change to account for reality.
Images and Files
This is a separate section in my document that functions like a list of appendices. Depending on the tools you use, you may be able to place the attachments inline where they apply to support your ideas with visuals. Don’t just use words.
The Point
To paraphrase Scott Berkun, nobody wants your requirements. They’ll be OK with theirs, though. Engage your people to define the details and everyone will benefit.
You hired smart people, right? Bring your technical teams ideas at a medium level of grain and tap into their talents. They’ll contribute ideas you never would’ve considered, and some you didn’t even know were possible. You’re a smart cookie, but not the only one in the jar.

Current State Vs. Future State

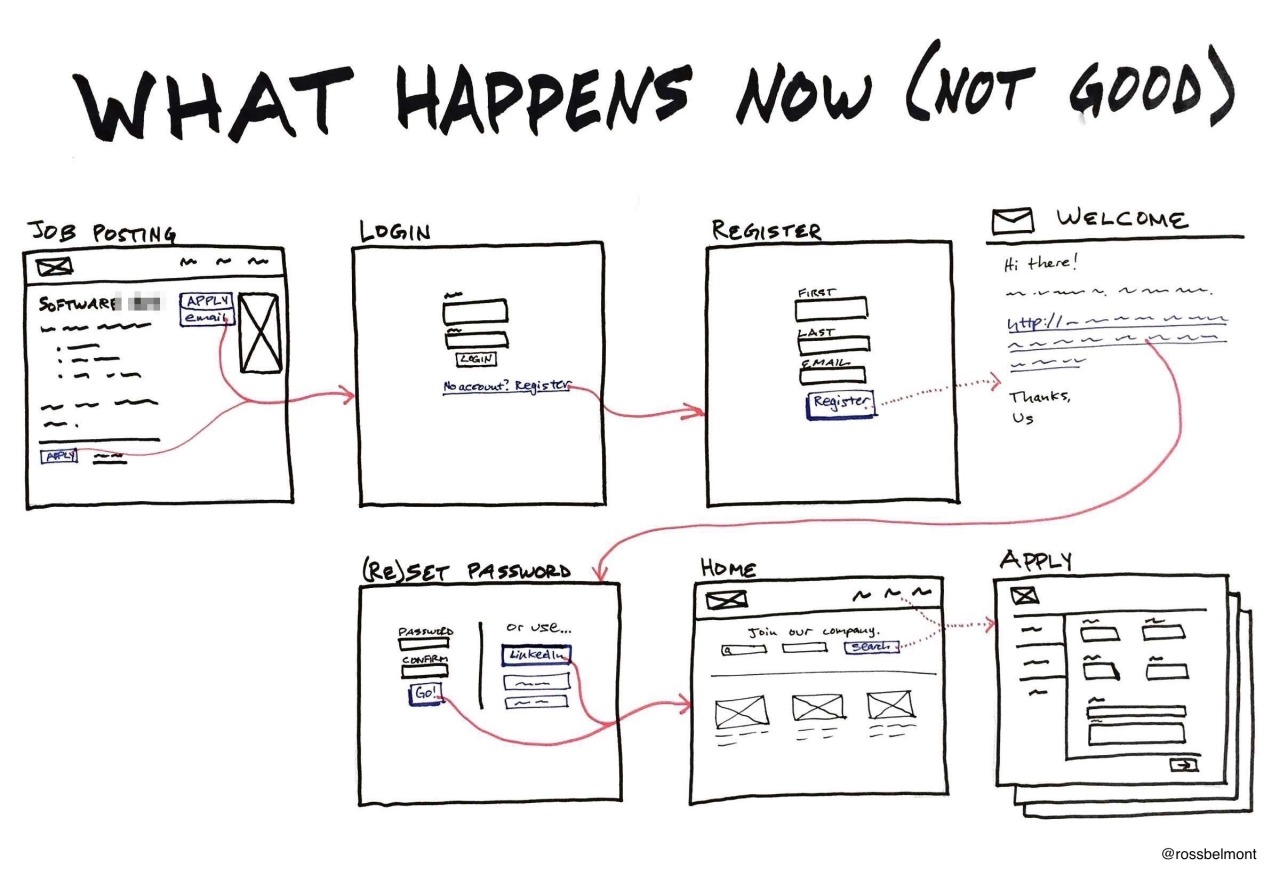
I’m one of those people who loves to see the details of how others do their jobs—especially if it’s similar to mine. So I was very grateful when Abi Jones, a designer on Google’s Search team, tweeted a UX comic she drew at work.
The lack of ceremony is great, but the light bulb moment for me was the contrast between the suboptimal current state and ideal future state. I realized the majority of my design work is for net-new functionality, and I needed a different way to pitch reworking something we already have. I made two separate images, but ideally they would fit on one page.
Thanks, Abi!
The Best for the Most for the Least
“We wanted to make the best for the most for the least.”
—Charles and Ray Eames
New technology often seems to exist for its own sake, instead of representing added productivity or true progress.
That’s why it’s so great to see this Fulbright scholar use 3D printing to create prosthetic limbs for children at a price that’s a hundred times cheaper than before. The arm in this video was built from $350 in materials; traditional methods have the price point of an entry-level luxury car.
Most insurance plans won’t cover a cost that high, only to do so again and again as the child grows. This innovation provides a practical solution to that very real business problem. This is design and technology, working together at their best.

Diagram of a typical OAuth user flow
OAuth Flows Suck
From a user experience perspective, I’d be lying if I said I was nuts about OAuth.
Process Bugs


Bugs happen—and when they do, no one gets their feelings hurt. We talk about them and solve the problem.
Our processes aren’t perfect, but it’s harder to openly discuss fixing them and take deliberate action to resolve what’s wrong.
That’s why I’m bringing the notion of process bugs into my team. These bugs may not be opened, verified, resolved and closed with the same speed, but at least we’ll have a way to discuss them without hurt feelings.
For bonus points, you can log these bugs as individual incidents and see if more than one is caused by the same underlying problem. I bet you’ll find this to be true.
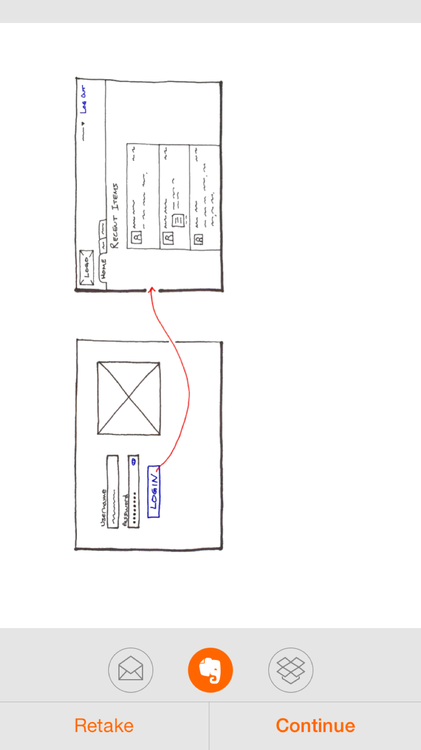
How to Make Paper Sketches Digital
Much like The Most Interesting Man in the World, I don’t always create detailed UI sketches. But when I do, I find it faster to create them on paper. So what’s the best way to share them with the team?
After lots of experimenting, I’m pretty happy with the Whitelines Link system. Here’s how it works.
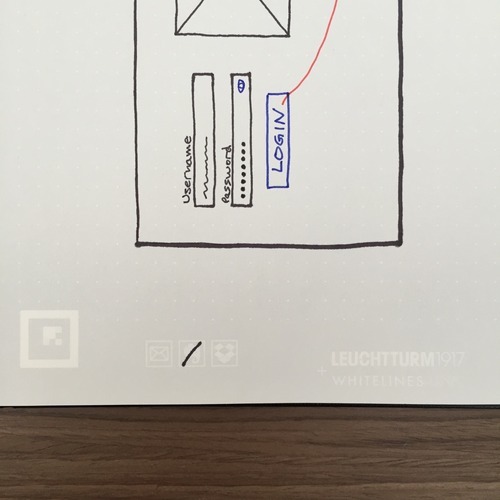
You’ll notice that the notebook’s “natural” orientation is vertical.

I usually end up rotating it for a wider surface, but not always.
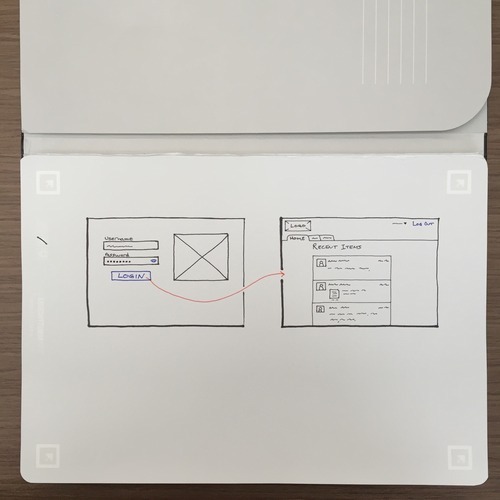
The mark on the left/bottom tells the Whitelines Link app to send this image to Evernote after scanning it in.
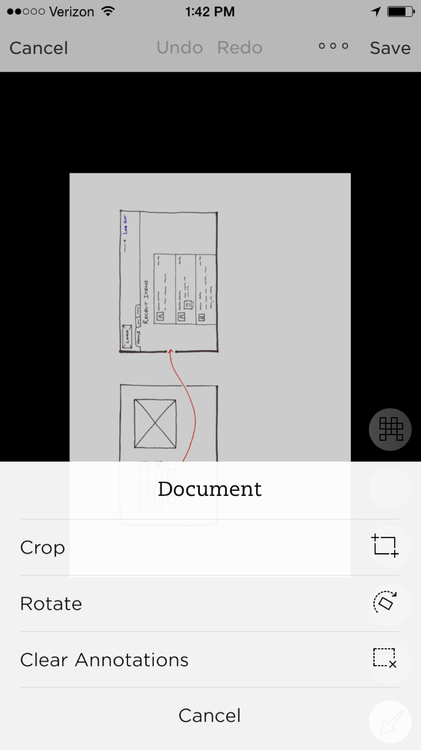
Then, I “scan” the page with the app. You can hold your phone at a sloppy angle, but the app seems to require photos to be taken in “portrait mode.”
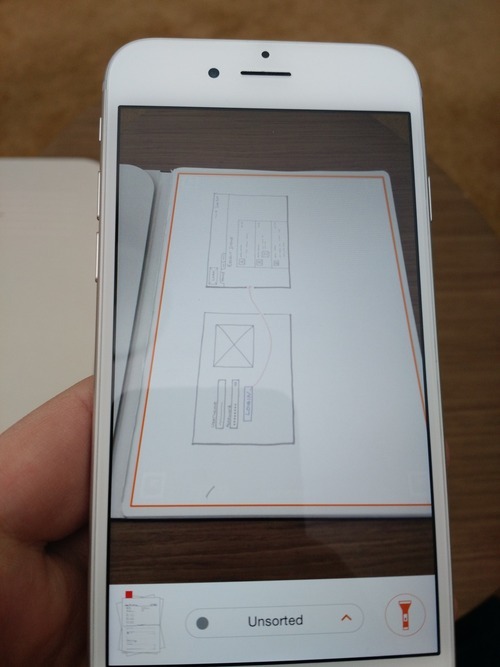
The app recognizes the image, removes the gray background, and detects Evernote as the destination.
If need be, I crop and rotate in Evernote.
Storing the sketch in Evernote allows me to organize sketches into different notebooks while also making them searchable.
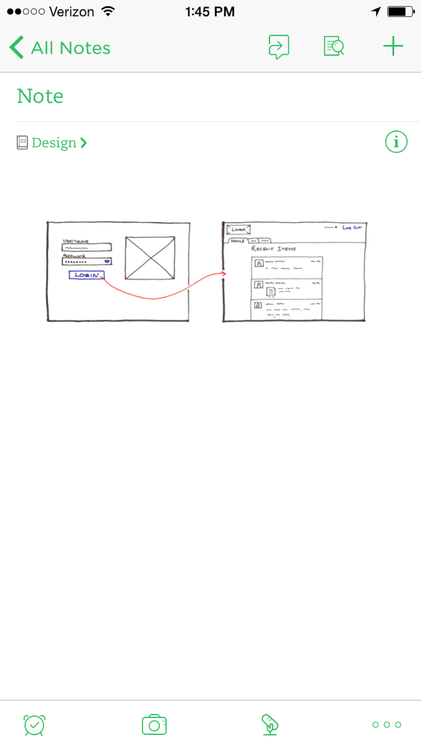
Usually, I export the image to send it to a teammate or post it to Basecamp/Trello/etc. This is an example of the final image people see.
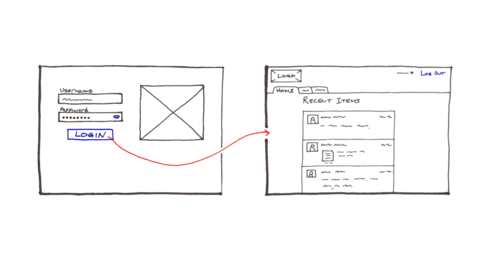
This may seem like a lot of steps, but it’s the shortest amount of time from idea to posted image. Try it for yourself—without the fancy notebook—by downloading and printing a template from the Whitelines web site.
The Lost Art of Prototyping →
This post (by a former engineer at Salesforce.com) represents a developer’s perspective on a prototyping approach nearly identical to the one we use at Appiphony. Clients sign off on a “steel thread” prototype built with actual code, and what comes after that is mostly testing and refactoring.
"Their customers never flinched." →
James Surowiecki:
You had tens of millions of affluent consumers. They ate out a lot. They were comfortable with fast food, having grown up during its heyday, but they wanted something other than the typical factory-made burger. So, even as the fast-food giants focussed on keeping prices down, places like Panera and Chipotle began charging higher prices. Their customers never flinched.It might seem that the success of fast-casual was simply a matter of producing the right product at the right time. But restaurants like Chipotle and Five Guys didn’t just respond to customer demand; they also shaped it. As Darren Tristano, an analyst at Technomic, put it, “Consumers didn’t really know what they wanted until they could get it.”Some of this is analogous to the recent rise of Apple as well. Certainly, there’s an element of “right place, right time”, but it’s also about shaping conditions to create that place at that time.
Few consumers can imagine new products or services they’d buy at anything but the “lowest resolution.”